Maintaining clean grout in your kitchen can significantly enhance the overall appearance and hygiene of your home.
Grout, which is the material filling the gaps between tiles, often becomes discolored and grimy due to the accumulation of dirt, grease, and other residues.
This guide is designed to walk you through the crucial steps required to effectively clean and seal your kitchen floor grout, ensuring it stays spotless and protected for longer periods.
You will learn about the necessary tools and materials, how to safely prepare your workspace and the most effective methods for cleaning and sealing your grout.
By following these instructions, you can restore your kitchen floor to its original beauty and maintain a cleaner, healthier home environment.
Clean grout is essential not only for the aesthetic appeal of your kitchen but also for maintaining a hygienic living environment.
Grout, being porous, can easily trap dirt, bacteria, and mold, which can lead to unsightly discoloration and even health issues if left unattended.
Regularly cleaning grout helps prevent these contaminants from building up, preserving the grout's color and integrity.
Clean grout contributes to the longevity of your tiled surfaces by preventing the wear and tear that accumulated grime can cause.
Maintaining clean grout is thus vital for both the visual and practical upkeep of your home, ensuring a pristine and healthy kitchen space.
To achieve sparkling clean grout, you will need a variety of tools and materials.
Essential cleaning supplies include a sturdy grout brush or an old toothbrush, a sponge, and a mop.
You may also require a stiff-bristle brush for tackling tougher stains. For the cleaning solutions, you can opt for a commercial grout cleaner or make a homemade mixture using ingredients like baking soda, vinegar, and hydrogen peroxide.
Personal protective equipment such as gloves, safety goggles, and a mask are crucial to safeguard against harsh chemicals.
A grout sealer and an applicator brush are necessary for the final step of sealing the grout.
Having all these tools and materials on hand ensures a thorough and efficient cleaning process, restoring your kitchen floor grout to its pristine condition.
When cleaning kitchen floor grout, it's essential to take safety precautions to protect yourself from potential hazards.
Always wear protective gloves to prevent skin irritation from cleaning solutions, especially if you're using chemical cleansers.
Safety goggles are crucial to shield your eyes from splashes and fumes, while a mask helps to avoid inhaling any harmful vapors or dust.
Ensure the area you're working in is well-ventilated by opening windows or using fans to disperse any strong odors.
Keep children and pets away from the cleaning area to avoid accidental exposure to chemicals.
Lastly, follow the manufacturer’s instructions on all cleaning products and tools to use them safely and effectively.
Taking these precautions will help ensure a safe and successful grout cleaning process.
Step 1: Preparation
Before diving into the actual cleaning process, proper preparation is essential to ensure both effectiveness and safety.
This first step involves gathering all the necessary materials and tools, such as cleaning solutions, brushes, and protective gear.
It's crucial to protect adjacent surfaces from potential damage by covering them and testing the cleaning solution on a small, inconspicuous area to confirm it won't harm your grout or tiles.
Taking the time to prepare adequately sets the stage for a smooth and successful grout cleaning experience, allowing you to focus on restoring your kitchen floor to its original pristine condition.
Clear The Area
Remove Furniture And Appliances
Before you begin cleaning your kitchen floor grout, it's vital to clear the area of any obstacles that could impede your progress.
Start by removing all movable furniture and appliances from the kitchen. This includes chairs, tables, rugs, and any smaller appliances like toasters or microwaves that sit on the countertop.
If possible, slide larger appliances such as refrigerators and ovens out of the way to access the grout lines underneath.
Not only does this make it easier to reach every part of the floor, but it also protects your belongings from potential damage caused by cleaning solutions or water.
By clearing the area thoroughly, you'll ensure a more efficient and effective cleaning process, achieving better results.
Sweep Or Vacuum The Floor
To begin the cleaning process on your kitchen floor grout, it is essential to sweep or vacuum the floor thoroughly.
By doing so, you remove any loose dirt, dust, and debris that could otherwise interfere with the cleaning agents and make the process less effective.
Start by using a broom or vacuum cleaner to cover all areas of the floor, including the corners and edges where dirt tends to accumulate.
Pay special attention to the grout lines, as these can harbor more embedded particles.
Removing all surface debris ensures that the cleaning solution can penetrate the grout more effectively, leading to deeper clean, and more satisfactory results.
This initial step is crucial for preparing your kitchen floor for the subsequent, more intensive cleaning stages.
Lay Protective Coverings On Adjacent Surfaces
To safeguard your kitchen from potential spills and splashes during the grout cleaning process, it's imperative to lay protective coverings on adjacent surfaces.
Begin by using painter's tape and plastic sheeting or drop cloths to cover cabinets, baseboards, and any other fixtures near the floor.
This extra layer of protection prevents cleaners, especially those containing harsh chemicals, from damaging your kitchen's surfaces and décor.
If you're using a homemade cleaning solution, this step is still important, as natural ingredients like vinegar and baking soda can still cause discoloration or other unwanted effects.
Taking the time to adequately protect the surrounding areas not only simplifies post-cleanup but also ensures a tidy and well-maintained kitchen environment throughout the entire cleaning process.
Gather Materials
Select Appropriate Cleaning Solutions
Choosing the right cleaning solutions is a critical step in ensuring the effectiveness and safety of your kitchen grout cleaning project.
The type of cleaner you need largely depends on the condition of your grout and any specific issues like stains or mold.
For routine cleaning, a mild soap and warm water mixture can be sufficient.
For deeper cleaning and stain removal, commercial grout cleaners are specifically formulated to dissolve tough grime and kill bacteria without damaging the grout.
For those who prefer a more natural approach, a homemade mixture of baking soda, vinegar, and hydrogen peroxide can be just as effective.
It's essential to read and follow the manufacturer's instructions on any commercial product and to test any cleaning solution on a small, inconspicuous area first.
This ensures compatibility with your grout and tile, preventing any potential damage or discoloration.
Assemble Essential Tools
Gathering the necessary tools is crucial to facilitate an efficient and effective grout cleaning process.
Start by sourcing a selection of brushes, including a stiff-bristled brush for scrubbing grout and a toothbrush for getting into tight corners and edges.
Make sure you have protective gloves to shield your hands from harsh chemicals and abrasive scrubbing. Safety goggles can protect your eyes from splashes, while knee pads will provide comfort during prolonged periods of kneeling.
A sponge or mop will be useful for rinsing and wiping down surfaces after cleaning.
Having all these tools at hand before you begin ensures that you can work steadily without interruption, contributing to a smoother and more successful grout cleaning experience.
Prepare Personal Protective Equipment
Before embarking on your grout cleaning project, it’s essential to prepare personal protective equipment (PPE) to ensure your safety.
Start with a pair of rubber gloves to protect your skin from abrasive cleaning chemicals and prevent irritation.
Safety goggles are crucial to shield your eyes from splashes and harmful fumes.
Wearing a mask, particularly an N95 respirator or equivalent, can help you avoid inhaling any dust or chemical vapors that may be released during the cleaning process.
If you'll be kneeling for extended periods, consider using knee pads to provide extra cushioning and prevent discomfort.
By preparing and donning the appropriate PPE, you not only safeguard your health but also make the cleaning process more comfortable and secure.
Test Cleaning Solution
Apply A Small Amount In An Inconspicuous Area
Applying a small amount of your chosen cleaning solution in an inconspicuous area is a critical step in the grout cleaning process.
This practice helps ensure that the solution will not cause any damage or discoloration to your tiles or grout.
Select a hidden spot, such as behind an appliance or in a corner that is not readily visible.
Apply a small amount of the cleaner and let it sit according to the product's instructions, usually around 5-10 minutes.
After the waiting period, inspect the area for any adverse reactions like fading or staining.
If the solution proves to be safe, you can proceed with confidence to clean the more visible and extensive parts of your kitchen floor.
This precautionary measure can save you from potential mishaps and ensure the integrity of your flooring remains intact throughout the cleaning process.
Wait And Observe The Reaction
After applying the cleaning solution to an inconspicuous area, it is crucial to wait and observe the reaction.
This waiting period allows you to see how the cleaner interacts with your grout and tile surfaces.
Typically, you should let the solution sit for about 10-15 minutes, following the manufacturer's guidelines.
During this time, monitor the area for any signs of discoloration, fading, or damage to the grout or tile.
Check for any undesirable side effects, such as unpleasant odors or residue.
Observing the reaction thoroughly before proceeding with the entire cleaning task can prevent potential damage and ensure that your chosen solution is safe and effective for use on your kitchen floor.
This step is essential to achieving the best possible results and maintaining the integrity of your surfaces.
Confirm Safety For The Entire Floor
Confirming the safety of your chosen cleaning solution for the entire floor is a vital step before proceeding with a full-scale cleaning.
After successfully testing the solution in an inconspicuous area, it's important to ensure that the positive results can be replicated across the entirety of your flooring.
Begin by reviewing the area's reaction to the cleaner, verifying that there have been no negative effects such as fading, staining, or residue buildup.
If multiple types of tile or grout are present in your kitchen, test each variety to ensure universal compatibility.
Communication with the cleaner's manufacturer or consulting with a professional can provide additional reassurance.
Only after confirming that the solution is safe for broad application should you move forward, confident that your entire kitchen floor will respond well to the cleaning process.
This diligence not only protects your investment in your flooring but also ensures a uniformly clean and appealing kitchen environment.
Step 2: Cleaning The Grout
Cleaning the grout is a critical step in revitalizing the appearance of your kitchen floor.
Over time, grout can become discolored and grimy due to dirt, grease, and daily wear and tear.
Addressing this issue not only improves the aesthetic appeal of your flooring but also helps maintain a hygienic environment.
This step involves scrubbing the grout lines with effective cleaning solutions and the right tools to lift stains and restore the grout's original color.
By dedicating time and effort to cleaning the grout properly, you ensure a cleaner, brighter kitchen that reflects a high standard of cleanliness and care.
Apply The Cleaning Solution
Evenly Distribute The Solution Over Grout Lines
To achieve the best results when cleaning your grout, it's important to evenly distribute the cleaning solution over the grout lines.
Start by applying the solution carefully along the grout lines, ensuring that every section is adequately covered.
You can use a spray bottle for liquid solutions or a brush for gel-based cleaners to help you control the application more precisely.
Pay attention to the amount you're using, as too much can be wasteful, and too little may be ineffective.
Once applied, allow the solution to sit for the recommended duration to penetrate the grime and stains effectively.
Even distribution helps ensure that the cleaning process is thorough and consistent, leading to a more uniform and pristine appearance across your entire kitchen floor.
Use A Sprayer Or Sponge For Application
Using a sprayer or sponge for application can greatly enhance the efficiency and effectiveness of cleaning your grout.
A sprayer allows for an even and controlled distribution of liquid cleaning solutions, ensuring that every part of the grout line is adequately covered without oversaturating the area.
This method is especially useful for larger surfaces, as it can save time and effort.
On the other hand, using a sponge can provide more tactile control, making it easier to apply the solution in areas that require more precision, such as corners or edges.
The sponge can help in gently scrubbing the grout while applying the cleaner, which may aid in loosening dirt and grime.
Whether you choose a sprayer or a sponge, both tools offer their unique benefits, allowing you to tailor your approach to the specific needs of your kitchen floor.
Allow The Solution To Sit For The Recommended Time
Allowing the solution to sit for the recommended time is crucial for achieving the best cleaning results.
This period lets the cleaning agents thoroughly penetrate the grout, breaking down stubborn dirt, stains, and grime that have accumulated over time.
Typically, the recommended duration is specified by the manufacturer and ranges from a few minutes to half an hour, depending on the strength and type of cleaner used.
During this wait, resist the urge to scrub prematurely; giving the solution ample time to work reduces the amount of physical effort needed later and ensures a more effective clean.
By adhering to the recommended wait time, you maximize the efficiency of the cleaning process, resulting in brighter, cleaner grout lines and an overall improved appearance of your kitchen floor.
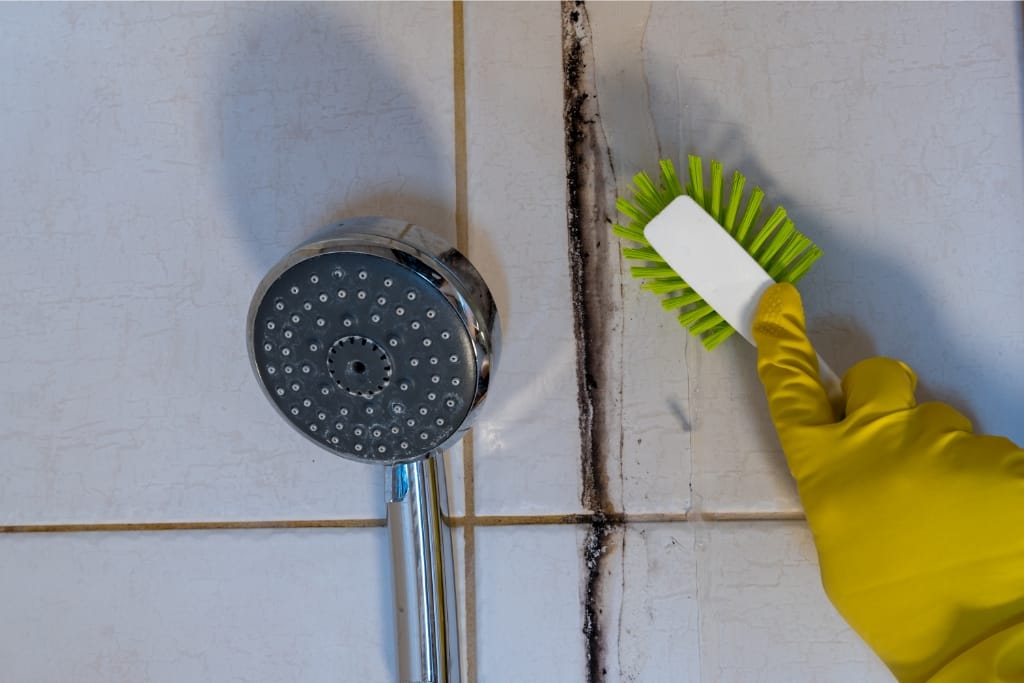
Scrub The Grout
Choose An Appropriate Brush
Selecting the appropriate brush is a key factor in effectively cleaning your grout without damaging it.
Depending on the condition and type of your grout, you can choose between hard or soft bristles.
Hard bristles are ideal for tackling stubborn stains and deeply embedded dirt, as they provide the necessary abrasion to lift grime effectively.
It's important to use them cautiously to avoid scratching or wearing down the grout, especially if it's delicate or already showing signs of wear.
Soft bristles, on the other hand, are gentler and more suited for regular maintenance cleaning or for older grout that may not withstand rigorous scrubbing.
They help remove surface dirt without causing damage, ensuring the longevity of the grout.
By selecting the right brush, you tailor your cleaning approach to the specific needs of your grout, ensuring both cleanliness and preservation.
Scrub In A Circular Motion For Effective Cleaning
Scrubbing in a circular motion is an effective technique for cleaning grout because it allows for thorough coverage and better removal of dirt and grime.
This method helps in dislodging debris trapped in the tiny crevices of the grout lines by applying consistent pressure from multiple angles.
The circular motion not only maximizes the cleaning solution's contact with the surface but also minimizes the risk of damaging the grout compared to more aggressive back-and-forth scrubbing.
This technique helps evenly spread the cleaning effort, ensuring no section of the grout is overlooked.
By incorporating a circular scrubbing motion, you can achieve a deeper, more uniform clean that revitalizes the grout and enhances the overall appearance of your kitchen floor.
Focus On Heavily Stained Areas Longer
Focusing on heavily stained areas longer is crucial for achieving a uniformly clean grout.
These areas often accumulate more grime and discoloration, making them tougher to clean compared to less soiled sections.
By dedicating extra time and attention to these stained spots, you allow the cleaning solution to penetrate deeper and work more effectively.
This might involve applying a bit more pressure with your brush or letting the solution sit slightly longer than usual.
The goal is to ensure that these stubborn stains are adequately addressed, which helps in achieving an overall even appearance.
Patience and thoroughness in tackling the heavily stained areas will result in a more pristine and visually appealing kitchen floor.
Rinse The Area
Use Clean Water To Rinse Off The Solution
Using clean water to rinse off the solution is a vital step in the grout cleaning process, ensuring that any residual cleaner and loosened dirt are effectively removed.
This final rinse prevents any lingering cleaning agents from drying on the grout, which could potentially cause discoloration or damage over time.
Fresh water helps to wash away any remaining particles, leaving the grout lines free of residue and looking their best.
It's important to use ample water and to thoroughly rinse the area, as neglected residues can attract more dirt, negating the cleaning efforts.
By using clean water for this step, you ensure that the grout not only stays clean longer but also maintains its integrity and appearance.
Wipe With A Damp Cloth To Remove Residues
Wiping with a damp cloth to remove residues is the finishing touch in the grout cleaning process, ensuring no leftover cleaner or dirt particles remain.
This step is essential for achieving a spotless and polished look, as any remaining residues can attract dust and grime, quickly diminishing the freshly cleaned appearance.
A damp cloth effectively picks up lingering debris without spreading it around, providing a final, thorough clean.
This gentle wipe-down helps to prevent any potential damage that could be caused by abrasive scrubbing or harsh chemicals reacting with the grout.
By meticulously wiping with a damp cloth, you seal in the results of your hard work, leaving your kitchen floor looking immaculate and well-maintained.
Let The Floor Dry Thoroughly
Letting the floor dry thoroughly is a crucial final step in the grout cleaning process, as it ensures that the grout and surrounding tiles are free from moisture that could lead to mold, mildew, or further staining.
Allowing ample time for drying helps in preventing slips and falls, particularly in high-traffic areas of the kitchen.
A completely dry floor provides a clear indication of any areas that may need additional cleaning or touch-ups, ensuring that any remaining blemishes are addressed before concluding the process.
Utilizing fans or opening windows can expedite drying, enhancing ventilation and efficiency.
By ensuring the floor is entirely dry, you not only safeguard the cleanliness and durability of your grout but also enhance the overall hygiene and safety of your kitchen environment.
Step 3: Sealing The Grout
Sealing the grout is an essential step in the maintenance and longevity of your kitchen floor.
After thoroughly cleaning and allowing the grout to dry, applying a quality sealant creates a protective barrier against moisture, stains, and daily wear and tear.
This barrier helps to preserve the grout's appearance and structural integrity by preventing dirt and liquids from seeping into the porous material.
Regularly sealing the grout ensures that it remains easy to clean and less susceptible to damage, thereby prolonging the life and beauty of your tiled surfaces.
Select A Grout Sealer
Choose Between Penetrating And Membrane-Forming Sealers
When choosing between penetrating and membrane-forming sealers, it's important to understand their distinct properties and benefits to determine which best suits your needs.
Penetrating sealers absorb into the grout, protecting within without altering the surface's natural appearance or texture.
They are particularly effective at repelling water and oil-based stains and are often used in areas prone to high moisture levels, such as kitchens and bathrooms.
On the other hand, membrane-forming sealers create a protective layer on the surface of the grout, sealing out contaminants and dirt.
This type of sealer can enhance the grout’s sheen and is ideal for low-traffic areas where aesthetic appeal is a priority.
Membrane-forming sealers may be more susceptible to wear off over time, especially in high-traffic zones.
The choice between penetrating and membrane-forming sealers depends on the specific conditions and requirements of your tiled surfaces, balancing durability, appearance, and maintenance needs.
Ensure Compatibility With Your Grout Type
Ensuring compatibility with your grout type is a crucial consideration when selecting a grout sealer.
Different grout formulations, such as cement-based, epoxy, or urethane, have specific characteristics that may interact uniquely with various sealers.
Cement-based grouts, being porous, often benefit from penetrating sealers that provide deep, effective protection against moisture and stains.
Epoxy grouts, however, generally resist moisture and stains inherently, but may still require an appropriate sealing solution to enhance their performance in certain environments.
Urethane grouts, known for their flexibility and durability, often require sealers that cater to their unique compounds to avoid detrimental interactions.
Before applying a sealer, it's essential to check the manufacturer’s recommendations and perform a patch test to ensure the selected product works well with your specific grout type.
By choosing a sealer compatible with your grout, you can ensure optimal protection and longevity, maintaining the aesthetic and structural integrity of your tiled surfaces.
Read And Follow The Manufacturer’s Instructions
Reading and following the manufacturer’s instructions is imperative when applying grout sealers to ensure optimal performance and safety.
These instructions provide detailed information on the proper application techniques, drying times, and necessary precautions to take during the process.
They may also specify the ideal temperature and humidity conditions for sealing, which can significantly affect the sealer's effectiveness.
Ignoring or incorrectly following the manufacturer's guidelines can lead to subpar results, such as incomplete sealing, premature wear, or even damage to the grout and tiles.
Understanding the specific requirements and recommendations helps avoid common mistakes and enhances the overall durability and appearance of your sealed grout.
By adhering to the instructions provided, you ensure a successful application, extending the lifespan and beauty of your tiled surfaces.
Apply The Sealer
Use A Brush Or Applicator As Directed
Using a brush or applicator as directed is essential for achieving an even and thorough application of the grout sealer.
These tools are specifically designed to ensure that the sealer penetrates deep into the grout lines while minimizing excess spread onto the tile surfaces.
It's vital to follow the manufacturer's recommendations on the type of brush or applicator to use, be it a small brush, a roller, or a foam applicator, as this can impact the final results.
Applying the sealer uniformly helps to avoid patchiness and ensures that the entire grouted area receives adequate protection.
Carefully working the sealer into the grout joints with the proper tool will enhance the longevity and resilience of the seal, maintaining both the appearance and functionality of your tiled surfaces.
Remember to clean the applicator tool after use as per the manufacturer's instructions to ensure it remains in good condition for any future applications.
Ensure Even Coverage Over All Grout Lines
Ensuring even coverage over all grout lines is critical for providing uniform protection and maintaining the aesthetic integrity of your tiled surfaces.
To achieve this, begin by applying the sealer in small, manageable sections, allowing you to focus on one area at a time without missing any spots.
Use a consistent technique, such as moving the brush or applicator in the same direction along each grout line, to avoid uneven application.
Pay particular attention to joints and corners, as these areas can easily be overlooked but are just as susceptible to staining and damage.
Overlapping strokes can help ensure that every part of the grout receives an adequate amount of sealer.
It’s important to periodically inspect the grout lines during the application process, checking for any missed spots or inconsistencies and correcting them immediately.
By meticulously covering every part of the grout, you ensure a durable and effective seal, thereby enhancing the longevity and beauty of your tiled surfaces.
Avoid Applying Too Much Sealer In One Go
Applying too much sealer in one go can lead to several issues that may compromise the effectiveness and appearance of your grout.
Excess sealer can create a slippery surface on the tiles, make the grout lines appear discolored or cloudy, and even lead to uneven drying, resulting in a patchy finish.
It's crucial to apply the sealer in thin, even layers, allowing each coat to fully absorb and dry before adding another if necessary.
This method ensures that the sealer penetrates deeply into the grout for optimal protection without creating a buildup on the surface.
Always refer to the manufacturer’s instructions for guidance on the recommended amount and drying times to achieve the best results.
By avoiding the temptation to apply too much sealer at once, you can ensure a more professional-looking finish and preserve the integrity of your tiled surfaces.
Final Touches
Allow The Sealer To Cure For The Recommended Time
Allowing the sealer to cure for the recommended time is a critical step in the sealing process, as it ensures the product achieves maximum efficacy.
The curing period typically involves leaving the sealed grout undisturbed for a specific duration, which can vary depending on the type of sealer and the manufacturer’s guidelines.
During this time, the sealer penetrates deep into the grout, forming a protective barrier that guards against moisture, stains, and wear.
Rushing this process can result in an incomplete seal, diminishing the durability and effectiveness of the sealing job.
It's important to keep the area free from foot traffic, water exposure, and cleaning agents during the curing period to avoid disrupting the sealer's bonding process.
By adhering to the recommended curing time, you ensure that your grout remains well-protected, extending its lifespan and maintaining the pristine appearance of your tiled surfaces.
Wipe Up Any Excess Sealer From Tiles
Wiping up any excess sealer from tiles is a crucial step to prevent a hazy or sticky residue that can mar the appearance of your tiled surfaces.
After applying the sealer to the grout lines, use a clean, lint-free cloth or sponge to gently remove any excess product from the surface of the tiles before it dries.
This ensures that the sealer remains concentrated where it’s needed most—in the grout—without creating an unsightly film on the tile itself.
It’s important to perform this step promptly and carefully, as allowing the excess sealer to dry on the tile can make it difficult to remove later and may require additional cleaning or buffing.
By thoroughly wiping up any surplus sealer, you maintain the clean, polished look of your tiles while ensuring that the protective properties of the sealer are fully concentrated in the grout lines.
Conduct A Final Inspection For Missed Spots
Conducting a final inspection for missed spots is an essential step to ensure the effectiveness and uniformity of your grout sealing job.
After allowing the sealer to cure, carefully examine the entire tiled surface under good lighting conditions, scrutinizing both the grout lines and tile edges.
Look for any areas where the sealer may have been applied unevenly or where the grout appears dry and unprotected.
Using a flashlight can help highlight any inconsistencies or gaps that need addressing.
If you find any missed spots, reapply the sealer to those specific areas, making sure to blend it seamlessly with the surrounding grout to maintain a consistent finish.
This thorough inspection helps to confirm that every part of your grout lines is adequately sealed, thereby maximizing the lifespan and appearance of your tiled surfaces.
Taking the time to perform this detailed check will ensure that your sealing job is comprehensive and professionally executed.
Grout-Eez Super Heavy-Duty Grout Cleaner is an exceptional product that has been trusted by professional cleaners and homeowners alike. It is specially formulated to break down even the toughest grease and grime, making it perfect for deep cleaning tile and cement grout surfaces.
The powerful detergent quickly dissolves away years of grime build-up, making them look brand new. It’s also pH-balanced and safe for use on all grout types without any risk of discoloration or harm to surfaces. With its high-performance capabilities, we highly recommend this product to anyone who needs a heavy-duty cleaner that’s safe to use on your tile and grout surfaces and is trustworthy.

Conclusion
Cleaning and sealing grout is a meticulous process that involves several crucial steps to ensure a long-lasting, professional finish.
The process begins with thoroughly cleaning the grout lines to remove any dirt, mold, or stains that could impede the sealing process.
Once the grout is clean and dry, the next step involves carefully applying the sealer, taking care to cover every part of the grout evenly and avoiding excess application.
After applying the correct amount of sealer, it is imperative to allow it to cure for the recommended period to achieve maximum effectiveness.
During this time, the area should be kept free from water, foot traffic, and cleaning agents to ensure the sealer bonds properly.
Finally, a thorough inspection is conducted to identify and address any missed spots, ensuring a comprehensive seal.
Following these steps diligently will protect the grout from moisture, staining, and wear, enhancing the durability and appearance of your tiled surfaces.
To keep your tiled surfaces in pristine condition, regular maintenance is essential even after the grout has been sealed.
Begin by wiping down the tiles and grout lines with a damp cloth or mop every week to remove surface dirt and prevent grime buildup.
Use a pH-neutral cleaner to avoid damaging the sealer while effectively cleaning the grout.
It's crucial to address spills and stains immediately, as prolonged exposure can undermine the sealant and lead to stains penetrating the grout.
Periodically, reapply a grout sealer according to the manufacturer’s recommendations to maintain its protective barrier.
Avoid using harsh chemicals or abrasive tools during cleaning, as these can strip away the sealer and damage the grout.
By adhering to these ongoing maintenance tips, you can ensure your grout stays protected and your tiled surfaces remain spotless and attractive for years to come.
Maintaining the longevity and aesthetic appeal of your tiled surfaces requires repeating the grout cleaning and sealing process periodically.
Over time, the wear and tear of daily use, exposure to water, and routine cleaning can degrade the effectiveness of the sealer, leaving the grout vulnerable to staining and damage.
To combat this, it's advisable to inspect your grout lines every six to twelve months and reapply the sealer as needed.
Performing regular maintenance not only extends the life of your grout but also preserves the overall appearance of your tiles, keeping them looking fresh and new.
By committing to this recurring upkeep, you ensure that your tiled surfaces remain resilient against moisture and stains, saving time and money on more extensive repairs in the future.
Download Our Free E-book!